 An Intro to Cherry Tomatoes
MY STATUS: Unsuccessful
Cherry tomatoes mature quicker than their larger cousins, so they're a good option for a place like Pohnpei, where prolonged exposure to the elements and pests is likely to result in crop failure. Quicker growth = less chance for birds, bugs, rot, fungi, etc. to take their toll before harvest. There are hundreds of types of cherry tomatoes. I chose to start with the
common large-fruited red type. I used
Ferry-Morse seeds purchased at
Home Depot in Southern California in early winter and put them in starter pots about 2 weeks later.
SUN, SUN, SUN
Tomatoes need maximum sun and lots of heat to produce fruit, otherwise they will just stay the way they are or, at the very most, put out more leaves. This is problematic on cloudy Pohnpei, where stats show that we get an average of three cloudless days a year. People I've talked to here say their plants grow great and get leafy, but rarely produce any fruit. That could point to several things: a paucity of sun, too much nitrogen and not enough phosphorous (nitrogen stimulates leaf growth, which can actually inhibit fruiting), or even lack of pollinators. I have some ideas about how I'm going to get enough sun once the plants have gotten to a certain size. Just keeping them on our porch probably won't be enough. The pots will be too big to move around to follow the sun. Avoiding excess nitrogen is easy if you use the right fertilizers at the right time. When it comes to pollination, the flowers just need to be vibrated or shaken a couple of times a day, which you can do yourself.
RAIN PROTECTION
Tomatoes also don't tolerate waterlogging. They need to be watered deeply two or three times a week, depending on how much sun they're getting but will drown if exposed to Pohnpei's rains. Other
maladies caused by too much water include root-rot, fungal infections, and mildew. Too little water can result in blossom-end rot. Use the 4-inch test to determine when to water. Stick your finger four inches into the soil. If the soil is moist, do not water.
BUGS
Pests are also an issue. A lot of things like to eat/attack tomatoes, including varieties of worms, beetles, mites, aphids, and whiteflies. I'm looking for a list right now of what pests exist on Pohnpei. Aphids and hornworms aren't found here, but whiteflies are definitely a big problem. They descended on some local pepper plants I had and sucked them dry.
ASSISTED POLLINATION
There are no honeybees on Pohnpei and few other insects that would be attracted to tomato blossoms and help pollinate them. As a result, most flowers will not develop into fruit unless you step into the role of pollinator. Once plants start to flower,
flower clusters should be gently vibrated or shaken in the middle of the day to encourage the pollen to fall from the male parts to the female parts (each flower has both). Be prepared, however, for some loss of blossoms, as they are fragile and sometimes break off on contact.
CROSS-POLLINATION ALERT
If you're growing multiple types of tomatoes at the same time and in close proximity, they can cross-pollinate. This won't affect the current generation of plants in any way, but if you plan to gather seeds from your plants for a second generation, you could end up with some strange unintended hybrids. However, if pollinators on Pohnpei are scarce (as they appear to be), then cross-pollination seems unlikely. In the absence of bees and butterflies, you'd have to actually rub the flowers on two plants together for them to pollinate each other.
What I Did
DAY 1 - SOWING
I
planted my seeds in small paper starter pots. I prefer not to use plastic any more than necessary. These pots are completely biodegradable. I filled each with store-bought garden soil, dug a 1/2 hole in the middle, and dropped in a few seeds. I covered the seeds and gave the pot 1/2 medicine cup of water a couple of times during the day, keeping the soil moist but not soggy.
DAY 5 - GERMINATION
Five or six seedlings poked their heads on the 5th morning and opened up their cotyledons (
below).
DAY 8 - THINNING
The seedlings have reached a height of about 2.5 inches (
left). Their stems are thickening up nicely and plenty hairy. I pulled out the weakest, smallest seedlings, leaving the two best-looking ones in each pot. I'll plant the biggest two seedlings and give the rest away.
DAY 13 - APPLICATION OF FISH EMULSION
The seedlings are looking great with 2-3 sets of beautiful true leaves. They're about 3 inches tall, lush and green. I gave them a dose of
Alaska Fish Emulsion when I watered.
DAY 15 - TRANSPLANTATION
The little guys have plenty of good leaves now. They were ready to plant (
right).
SOIL PREPARATION:
- I used a 5.5 gallon pot for each tomato plant to give the roots plenty of room to expand.
- First, I poured in a 2-inch layer of medium basalt gravel (rinsed). This layer and the following one are there to help the soil stay drained, so the roots of the plants don't rot.
- Second, I poured in a 1-inch layer of fine black sand. Sand can be purchased at the APSCO Gravel Quarry on Sokehs Island. A 20-kg bag of fine blasting sand costs $5.00. Wash before using.
- Next, I added a 1-inch layer of steer manure. Once the roots get down toward the bottom of the pot, they'll find a reservoir of extra nutrients for the final stage of growth.
- Finally, the pots were filled nearly to the brim with a balanced mixture of store-bought garden soil and Miracle Grow Potting Mix. Nothing really fancy. I'll add liquid fertilizer as my plants develop.
- In each pot, I dug a trough about 1/2 inch deep and several inches long and buried my plant stem horizontally in the trough so that only the very top of the plant (including the cotyledons and true leaves) were above ground (below). I did this to counteract the legginess of the plants and encourage greater root development. All those little hairs on the stem will turn into roots and the plant will end up well-anchored and nice and stocky, requiring less artificial support. I pressed the soil down a bit and watered quite deeply.
DAY 16-19
We're having a wet week and there has been very little or no sun. I'm just keeping the plants out of the rain.
DAY 20
We had a little sun today. Not much, but better than most days this week. I'm confident the little guys will start growing like crazy if we can just get a few solid days of UV!
DAY 21-22
Hot, bright sun! My plants hadn't seen much solar activity since being planted and they were a little sensitive to a direct equatorial pounding.
Watering them well and misting the leaves with ice water keeps them perky during the hottest parts of the day.
DAY 23
The little guys are established and large enough now that they can handle an entire afternoon of the hottest sun Pohnpei can muster. They even seem to like it now that they've got their legs.
DAY 24
My little cherries have grown like there's no tomorrow, doubling in size in just a few days (
below).
DAY 29
These guys are thirsty! I've been watering deeply three times a week, which allows the soil to almost entirely dry in between. The plants continue to grow at a startling rate, putting out new branches about every 2-3 days. Two weeks after transplantation, they look like this (
below).
DAY 31
DAY 37
Both plants are now
12 inches tall with 10 major branches (
right). I'll start snipping any new branches fairly soon. So far, branches are sturdy, but it's getting near the time where some supports will need to be installed. Yesterday there was the first appearance of a couple of
whiteflies. I think I can stave off a full-blown infestation, but I'm not happy they are there at all. They first appeared on the bell pepper leaves, but I've killed two or three on the tomatoes and at least one on the basil.
DAY 46 - POSSIBLE VERTICILLIUM OR FUSARIUM WILT
I'm very worried that the two cherry tomato plants have either
fusarium or
verticillium wilt (fungal infections). If so, they are doomed, and the infection could spread to the other four plants. I've sent photos of the symptomatic areas of the plant to a few knowledgeable people and am waiting for their advice.
We've had almost two weeks now with virtually no sun and lots of rain. Though the plants are out of the rain, the cool temperatures and wet weather probably didn't help anything. I'm still figuring out what to do. I'm also still seeing an occasional whitefly here and there, but I check twice a day and kill any I see (nothing hi-tech; I just crush them with my thumb). Growth has slowed to a crawl with the departure of the sun.
DAY 49 - FIRST BLOSSOMS
I'm still not sure if these plants are infected with something or just stressed because they got no sun for two weeks and have now been absolutely baked by extremely hot weather two days in a row. Some of the symptoms seem like
fusarium or
verticillium--wilting of young leaves in the sun, some yellowing of lower leaves seen in the previous picture. But . . . after I cut off the leaves that were dead several days ago, no more have died, and today the wilting only happened for a couple of hours when first exposed to sunlight. The entire rest of the day, the plants were in very intense direct sun and the wilting had subsided by noon. Furthermore, both plants are
now displaying small yellow flowers near the top. That could be a good sign. I sent photos to an expert, who said he didn't think it looked quite like a
fungus, but he went on to say that tomato diseases are very difficult to
diagnose, especially in the early stages. He suggested I watch and wait.
They seem to have reached their max height now with about 10 branches (I cut a few of the less healthy-looking branches off). I also snipped off the growing stem of the plant at the top today to encourage the plants to put their energy into their existing branches and fruit production. I gently shook the flowers together. We don't have any bees here and few wasps or butterflies, and this technique supposedly does the trick. No pollination--no tomatoes.
DAY 52
I found quite a few more whiteflies on the plants than the usual 3-5, so I gave both plants a spritz with the
Safer Brand Insect Killing Soap. Both plants have two clusters of developing blossoms. I have continued to shake the blossoms together a couple of times a day to facilitate pollination. When it's time for the next watering, I'll give them a shot of tomato fertilizer to help them move toward fruit-setting.
DAY 53 - FERTILIZER APPLICATION
I gave my plants a dose of
Miracle Grow tomato fertilizer today to help push them on toward fruiting.
DAY 55 - STEMS STAKED
I staked the main stems today with wooden dowels (above). I'm working on some sort of wire cage for when the plants get nearer to tomato-time. I've also been busy keeping the suckers at bay. Suckers are the little branch sprouts that appear at the intersections of the stem and the primary branches. Essentially, you want to clip off any suckers you find. They draw nutrients away from the important processes of the plant, such as fruit production. I also put a stop to the main growing stem by snipping the top of the plant. I don't want them to grow any taller. I want them to flower and fruit.
DAY 59 - NO FUNGUS! YIPEE!
After a major scare, I can now officially say that
my plants do NOT have a fungal infection. Back on Day 46, I had some leaf die-off, which initially looked like
fusarium wilt. I had three tomato experts look at photos of the dead leaves. One said it was hard to call; tomatoes are notoriously difficult to diagnose. He said not to do anything yet. Experts 2 and 3 said it looked like
fusarium wilt and bacterial wilt, respectively. It turns out Expert 1 was on the money. The evening after the first leaves began to wilt and die, I cut off all the affected leaves and the lowest branches. Two weeks later not one leaf has turned brown. Both plants are flowering all over the place. Everything is green and lush. That would be impossible for a plant suffering from a terminal fungal or bacterial infection.

There are other explanations for the leaves dying when they did. My best guess is that the plants suffered some cell damage when they were heavily sprayed with the insecticidal soap the first time. That's when all the problems began. Another possibility is that I just wasn't watering enough.
I'm much more careful now about doing the 4-inch soil test to regulate when I water. We've also had some good sunny days. So, we're back on track! Things look good and I'm hopeful that I'll have some tomatoes pretty soon.
I also got some
Seabright Labs Sticky Aphid & Whitefly Traps in the mail today and hung a couple of them up. They are essentially bright yellow cards covered with an ultra-sticky clear goo. The whiteflies are drawn to the color and then hopelessly stuck. Nice. I will continue to inspect the leaves of both plants twice a day as long as whiteflies remain.
DAY 62 - DEVELOPING TOMATOES
I have developing tomatoes! The blossoms have dropped off now and in their place are tiny green spheres about the size of a BB pellet. These are the infant tomatoes. There are 37 of them so far on the two plants. I suppose I can expect to harvest in the near future if I don't do something stupid in the meantime and mess things up. I'm building a PVC sun house so I can get the tomatoes off the porch and up on the roof where they'll get all the sun Pohnpei can muster. Probably should get that done right away and give these little guys some help.
DAY 70 - A SET-BACK: DISASTROUS WIND
My first attempt to build some sort of "sun house" for the tomatoes, so they'd get the maximum amount of sun available, was a bit of a failure. My design was based on several plans found online: an arched structure (like a Quonset hut), built with PVC and covered with clear plastic. I'm sure the structure I built would work great in a lot of places, but it probably won't last long here without some modifications. Where we live, we have no open ground available for gardening. The only flat space is our roof, which is somewhat exposed to the gusty winds we get here randomly a couple of times a day. Most often, the winds come with rain and usually lasts only 15-20 minutes. But it can be pretty strong and it can come from pretty much any direction or change direction several times in minutes. Wind was, in fact, part of the reason I wanted a structure with some protection on the sides--because our rain frequently gusts sideways, making things wet that are covered by a roof. I positioned my structure perpendicular to the prevailing wind pattern and weighed it down with cinder blocks. It's unlikely that it will actually blow away. What seems more probable is that the continued stress inflected by the winds will soon cause the fittings to break. Probably even sooner than that, the plastic covering it will be shredded. I knew once I started putting the pieces together that my structure was too tall. I intended for it to be maybe a foot taller than the tallest plants. Somehow it ended up tall enough to stand comfortably. Major wind target.

Long story short . . . on the first evening my plants were up there, there was a big gusty storm that lasted a quarter of an hour. When I went up to check on the plants, I found branches broken from three of my tomato plants--and most distressing--
one of the two fruiting cherry tomato plants had snapped in half on the main stem! :(
I did some research about main stem breaks on tomatoes, and it turns out my plant will be fine.
Tomato plants with severed stems will recover with time, grow a new stem, and probably fruit again. But, I'll have to wait for that, and I lost the nearly 20 infant tomatoes that were already on the darn thing.
Why did this happen? When I staked the plants, I didn't use stakes that were long enough to account for much more growth. I just didn't notice when the plants outgrew their stakes. The one that broke was maybe 8 inches taller than the stake and the break happened slightly lower than that. Would it still have broken if the stake-job was better? Maybe not. But staking aside, the winds up there on the roof are just too intense for tomato plants. Lesson learned.
Needless to say, I brought the tomatoes back down to their former location, and I am considering how to modify the structure so that it can be useful and not be a total waste of $100+.
DAY 76 - TOMATOES
Despite losing the top of one of the cherries, the other has some 17 developing tomatoes on it. A few of them are marble-sized now.
DAY 96
The snail's pace at which these tomatoes are ripening points to something amiss. My first guess is lack of necessary sunlight. Getting the plants into some sort of sunhouse is essential if I'm going to continue playing around with tomatoes. My second guess is that these plants are too confined by their containers. I need larger pots for the next round.
DAY 116 - DECLINING HEALTH & TERMINATION
I finally
harvested the 17 tomatoes on this plant after waiting more than 40 days for them to ripen. They did turn red, but most of them were
abnormally small and lacked any sweetness. The plant showed no sign that it would flower again, and the
whitefly infestation had caused the destruction of a significant number of the plant's leaves. As the other tomatoes were having similar problems, I decided to take drastic measures by pulling them all up and disposing of them. In doing this I found indications of one problem that probably contributed to the plant's poor health:
crowding. Even with 6 gallon pots, the roots had filled the space they had to work with. Everything I've read or been told about tomatoes agrees that plants won't do much of anything once they're pot-bound.
I've already sowed some seeds for my second attempt (though not this variety). I think this time I will try growing the tomatoes in pig feed bags. They're huge and I can get them second-hand for free.


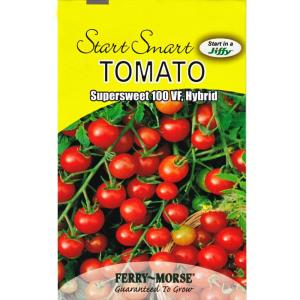
 Supersweet 100VF Hybrid are a type of round cherry tomato with a resistance to verticillium and fusarium wilt. Like all the tomato varieties I've
tried to grow here, they are indeterminate, meaning that plants will continue to produce fruit as long as the weather is sufficiently warm--a
good choice for Pohnpei's endless summer temperatures. Plants can grow to a height of 4 feet and take 80-90
days to mature. Fruit are small, but cherry tomato plants tend to be more prolific than large varieties. I used Ferry-Morse Start Smart seeds purchased at Home Depot in Southern California in early winter. They were kept in the fridge for about 4 months.
Supersweet 100VF Hybrid are a type of round cherry tomato with a resistance to verticillium and fusarium wilt. Like all the tomato varieties I've
tried to grow here, they are indeterminate, meaning that plants will continue to produce fruit as long as the weather is sufficiently warm--a
good choice for Pohnpei's endless summer temperatures. Plants can grow to a height of 4 feet and take 80-90
days to mature. Fruit are small, but cherry tomato plants tend to be more prolific than large varieties. I used Ferry-Morse Start Smart seeds purchased at Home Depot in Southern California in early winter. They were kept in the fridge for about 4 months.
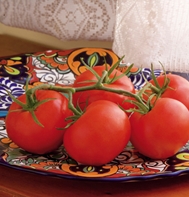
 If you're growing
multiple types of tomatoes at the same time and in close proximity, they
can cross-pollinate. This won't affect the current generation of plants
in any way, but if you plan to gather seeds from your plants for a
second generation, you could end up with some strange unintended
hybrids.
If you're growing
multiple types of tomatoes at the same time and in close proximity, they
can cross-pollinate. This won't affect the current generation of plants
in any way, but if you plan to gather seeds from your plants for a
second generation, you could end up with some strange unintended
hybrids.




.jpg)


