Sweet Basil

Sweet Basil has been hugely successful on Pohnpei, producing 3 cups of leaves about every four days.

Cherry Tomatoes

Trying to grow tomatoes on Pohnpei has been a struggle, but I'm making progress.

Common Herbs

Most of the traditional herbs, including parsley and oregano, have grown like weeds.

Lettuce

I've recently branched out into lettuce-growing and found unexpected success.

Lavender

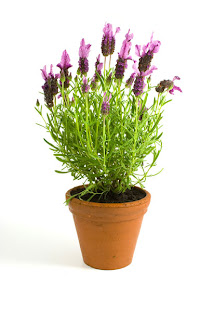
A plant that has truly surprised me is lavender, which is notoriously difficult to propagate from seed.

Cilantro

Though unhappy with Pohnpei's hot weather, I was able to grow cilantro with care and whip up some nice batches of fresh salsa.

Pesto Pizza

One of the benefits of having so much basil is trying new recipes, like this delicious pesto pizza.

Mint

I was lucky enough to propagate two types of mint from cuttings, though I had no success growing the plant from seed.

Showing posts with label flowering. Show all posts

Thursday, May 30, 2013

Petite Marigolds

An Intro to Marigolds

MY STATUS: Grown Successfully to Harvest  

San Marzano are a type of plum tomato with an elongated body and firm flesh used primarily for making tomato paste for sauces.  They're similar to Roma tomatoes but are said to have a stronger, sweeter taste. Because they aren't as tender or juicy as the large beefsteak tomatoes, they aren't as desirable for salads and sandwiches. Like all the tomato varieties I've tried to grow here, they are indeterminate, meaning that plants will continue to produce fruit as long as the weather is sufficiently warm--a good choice for Pohnpei's endless summer temperatures. Plants can grow to a height of 6 feet and take 80-90 days to mature. Fruit are about 4 ounces. I used Martha Stewart Living seeds purchased at Home Depot in Southern California in early winter. They were kept in the fridge for about 4 months.

SUN, SUN, SUN

I feel like I've said this a lot: successful tomatoes depend on lots and lots of sun. The plants may survive in shade, but they will not produce fruit. One thing I'm still trying to figure out is how to get my tomatoes out in the open where they can get maximum sun and still be protected from rain and wind. Right now they get about 3 hours of direct sun in the afternoon (on a sunny day), which is just not enough. I tried building a PVC structure, but that didn't stand up to the crazy gusts of wind we get here. Now I'm thinking about something constructed of metal or wood.

RAIN PROTECTION

Another statement I've repeated a lot: Keep the tomatoes out of the rain. Depending on how hot and sunny it is, they may need water two or three times a week. More than that and they will develop fungal and/or bacterial infections, rot or drown. Use the four-inch soil test to determine when to water: if the soil is moist at a depth of four inches, do not water.

PESTS AWAY

Marigolds are famous for repelling pests. They have a strong smell that many types of bugs can't stand. The question is whether they will have any effect on my primary enemy: the Pohnpeian whitefly.

What I Did

DAY 1 - SOWING

I scattered my seeds all around the main stems of my tomato plants, threw a thin layer of soil over them, and watered.

DAY 60 - BUSHY PLANTS BUT NO FLOWERS

Not sure what the problem is. The plants look good, so why aren't flowers developing?

 60-day-old marigolds

DAY 97 - FULL BLOOM (9/5)

97-day-old blooming marigolds
I don't know why, but these flowers took a long time to get started. Plants grew quickly, but 6 weeks ago, there wasn't more than one or two flowers. The plants were big and bushy, but nothing. Everything changed when I fertilized. I'm used to growing herbs that don't need a lot of soil enhancement, but the marigolds were certainly waiting for it. One dose of chicken manure and they pepped up. Buds developed all over the place and have recently opened. One thing I've noticed, though is how flimsy and tall the stems are. I ended tying a piece of twine around the whole bunch to keep them together otherwise plants around the edges would start to bend over.

I haven't done any scientific trials to see if the marigolds are really the cause of the whitefly-free garden, but it seems like a possibility. They're definitely nice looking. :)

97-day-old blooming marigolds

Tuesday, April 16, 2013

Salad-Slicer Cucumbers

Salad-Slicer Cucumbers
MY STATUS: Unsuccessful   

What I Did

DAY 1 - SOWING

I sowed Burpee Salad-Slicer Cucumber seeds in a wide but fairly shallow pot with gravel on the bottom and regular potting soil. The soil was gathered into two large mounds and a few pairs of seeds were pushed into the soil of each mound at a depth of about 1 inch. Seeds were purchased at Pohnpei Ace Hardware a few days before planting and kept refridgerated. From the package it looks like they ship these seeds in from Walmart?? Funny.

DAY 3 - GERMINATION

I've kept my container in direct sun every since Day 1, and, boy, have we had sun! These plants seem to like it. They were among the fastest to germinate. Virtually all the seeds I planted came up.

DAY 6 - THINNING

Cucumber seedlings 3 days after germination
Seedlings were thinned to two per mound, so that I have a total of four plants in one container. They are about 1 inch tall and look healthy, already with their first true leaves. I will put in a scaffolding of bailing wire soon before the plants get much bigger. Cucumber plants aren't self-supporting and will fall over once they have some size unless you put a cage or some other support around them.

DAY 18

18-day-old cucumber plants
I have to say that I am loving these plants! First, they are incredibly rapid growers. Secondly, I am fascinated by a particular feature of the plant's physiology--the clinging tendrils. These things are amazing! They're like prehensile monkey tails. They grow out from the stem and search for anything to latch onto and then wrap themselves tightly around it like a boa constrictor. I used heavy wire about a week ago to create a trio of simple hoops over the plants. The tendrils grabbed onto the wires in an couple of hours. The plants are now well-supported. As they get taller, I'll add some larger hoops and then run some twine up to the roof of my garden shelter so they can climb as high as they like. Everything seems great in the shelter where these guys live. They are loving all the sun we've been having for about two weeks. I have had to water more frequently because of the heat, watering deeply so that the soil at the surface stays moist.

18-day-old cucumber plants
Cucumber plant tendril grabbing on to a wire support

DAY 22

I continue to find my cucumber plants charming. The way the little tendrils reach out and twist around stuff is so cool! I just added another trio of larger wire hoops to accommodate the height of the plants Also, today I found a new plant that had just germinated three weeks after the others. Odd.

DAY 27 - FLOWERING

Flower on 27-day-old cucumber plant
These plants' growth has been off the charts. I had to add more wire supports a few days ago and then a network of twine going to the ceiling so they'd have something to hold onto as they climbed. They are now all the way to the 5-foot roof and starting to grow horizontally along the top. Today beautiful yellow flowers opened all over the plants. Hopefully cucumbers will be developing fairly soon!

DAY 32 - CUCUMBERS!

Developing cucumber on 32-day-old plant

Six days after flowers first opened on the cucumber plants, I have my first developing cucumbers. They're about a half-inch long. Super cute. There are quite a few of them and the plants show no signs of slowing down. Having reached the vertical limit of the garden structure, they continued out the space on the side and have grown another foot in two days. All I can say is--cucumbers rock! You can tell that my variety is the pickling type. They look like miniature dill pickles. Love it.
First cucumber at 45 days

DAY 45 - FIRST CUCUMBER

A month and a half after sowing, I have my first cuc. What a cutie. It's a perfect three-inch long pickler. What actually surprised me was how fast it grew from a baby to picking size. Pretty cool. What's not cool is how many babies I lost to this heat wave. Despite watering sometimes twice daily, the intense heat has withered any cucs that weren't shaded by the plant's leaves. Grrr. On the bright side, the plants show no signs of slowing down, so there should be more where this first one came from. Time to throw some chicken manure on there and feed these guys. In my second batch I'll probably see if I can rig up some shade cloth over these guys. Full Pohnpei sun might not be necessary.

DAY 53 - APHIDS

50-day-old cucumbrer plant taking over garden shelter
I wasn't sure if aphids were found on Pohnpei. Now I know they're here. The cucumbers have quickly developed a sizable infestation. What tipped me off were the large numbers of ants crawling around on the plants (ants farm aphids and protect them from predators) and the presence of a sticky substance on the leaves that grew a blackish mold. The sticky stuff is called honeydew, and it is secreted by the aphids. Mold, in turn, grows on the honeydew. Now, the strange thing is that the aphid infestation doesn't seem to be adversely affecting the plants much. They are still producing cucumbers. I should get a nice batch before I pull these guys up and replant. I think I may try planting them in the open next time, where the rain will fall on them. They seem to love water (one long section of the plant has grown out of the shelter along the top of the roof and is completely exposed to rain, and yet this strand has produced the most cucumbers), and the aphids would be washed off by regular deluges. I've also noticed that the aphids haven't spread to any other species of plant, even though they are in close proximity to everything in the garden shelter. It seems the aphids don't like tomatoes or all the herbs I have (yet).

DAY 61 - TERMINATION

I decided to take an axe to the cucumber plants today (metaphorically). Though they have been productive, there were several issues and I can't chalk them up to a win:

Aphids on the underside of a cucumber leaf
  1. The aphid infestation was becoming problematic and I was afraid the beasts would travel from the cucumbers to other plants in my garden. They were also causing the growth of mold which had spread from infected leaves to parts of the shelter they were touching. Again, I didn't want mold on any other plants.
  2. The extremely hot weather has not been good for the cucumbers, stressing the plants and making the fruit bitter. These guys need more shade the next time around and less blazing hot days. One type of weather benefits a particular plant (like the tomatoes), while stressing another (cucumbers). These plants grew fast, so I'm not too broken up over their destruction. I'll find a new location to plant with partial shade and probably also wait for a shift in the weather.
  3. Salad-slicer cucumbers 55 days after sowing
  4. Though the plants seemed not to mind being in a fairly small container, watering was an issue. They are thirsty plants, cucumbers, and the soil in my pot was drying out too quickly in this heat. If I forgot to water right on schedule, the plants wilted in the sun. I'm thinking pig feed bags for these guys on the second run, since they've worked so well with the tomatoes.

ATTEMPT 2 / DAY 1 - SOWING (12/23)

I sowed my cucumber seeds much in the same way as the first time, except that this time they were planted in a large, deep pig feed bags with about three times as much soil and depth. The soil was gathered into a single mound and a few pairs of seeds were pushed into the soil at a depth of about 1 inch. The seed variety sowed this time are a little different than before. I used a type ideal for pickling. As the weather has cooled down considerably since the early fall with many more overcast days, I'm hoping I'll have more success and my cucumbers won't go bitter.

Tuesday, April 2, 2013

Lavender

Lavender

An Intro to Lavender

MY STATUS: Grown Successfully to Harvest

Lavender refers to a genus of flowering plants that includes 39 different species. It is primarily a temperate plant that prefers dry, well-drained sandy or loamy soils, very different from what Pohnpei has to offer. It does well throughout Europe, particularly in the drier areas such as Spain and Italy, and in Southern and Central California. I knew it would be a struggle to grow it here on Pohnpei, but I'm going to try.

SUNNY & DRY

Lavender likes lots of direct sun, but isn't keen on humidity. It's prone to root-rot, which can happen easily when it is planted in soil with lots of organics. For this reason, it's better to plant it in a mixture heavy with sand or even fine gravel. It grows quite slowly when it isn't getting maximum sun; it might take 1-2 years for the plants to mature.

FLEXIBLE SOIL REQUIREMENTS

The plant is said to rarely need fertilizer, performing well in poor soils, and only needs to be watered occasionally.

5-month-old lavender plants


The purple flowering stocks of the plant are highly aromatic, attracting bees and other beneficial insects that play a role in pollination, while repelling moths and other pests. They are often dried and used in potpourri, aroma-therapy, and flower arrangements.

What I Did

DAY 1 - SOWING

I sowed my lavender at the same time and in the same way as most of my other herbs. The seeds were spread on the top of the soil in 4 paper egg cups and then sprinkled with more soil. I kept the soil moist but not wet, moved the egg container outside and into direct sun whenever it was available, and kept it inside at night. I used Ferry-Morse StartSmart seeds purchased from Home Depot in Southern California (Lavendula Verea).

Lavender seedlings 5 days after germinationDAY 9 - GERMINATION

The lavender seeds germinated and small, fragile seedlings began to develop.

DAY 14

The seedlings are little taller, but still pretty frail looking (left).

DAY 16 - TRANSPLANTATION

Unlike the other herbs started on the same day, the lavender did not shoot up. It stayed small and near the ground. No true leaves had developed, and I wondered if it wasn't getting enough heat. I decided to plant it in a pot.

SOIL PREPARATION & PLANTING:
  • Lavender supposedly does pretty well in pots-- even fairly cramped pots. I chose a 1-gallon pot.
  • I began as I usually do with a 1-inch layer of coarse basalt gravel in the bottom.
  • The rest of the pot was filled with a 50% fine black sand, 25% Miracle Grow Potting Mix, and 25% local dirt mixture.
  • Rather than break apart the soil in the egg cups, I let them dry out a bit, carefully popped them out, and planted the soil plugs in the pot. If I did this again, I might just try to sow my seeds right in the pot to begin with.
Lavender seedlings 18 days after germination

DAY 25

The seedlings look healthy, but they are growing very, very slowly. At this rate it will take YEARS to have real plants!

DAY 27

The seedlings are still tiny and low to the ground (right). They wilt easily in strong sunlight and don't respond well to watering either.

DAY 29 - APPLICATION OF FISH EMULSION

Since I was fertilizing other plants, I decided to water the lavender with Alaska Fish Emulsion. What the heck? They aren't doing anything anyway.
Lavender seedlings 21 days after germination, following fertilizer application

DAY 30 - NEW GROWTH AND DEVELOPING TRUE LEAVES

Break-through! Apparently, the lavender wanted a little more food. There was major growth overnight and new sprouts popped up all over the pot (left). These might be from seeds that hadn't yet germinated, but I'd like to believe they are coming up from the developing root system. Some of the existing seedlings now have the tiny beginnings of true leaves.

DAY 40

The lavender is finally starting to look like a plant, rather than a patch of scrawny seedlings! The stems are thickening and getting some height, multiple sets of leaves popping out (below). New shoots come up all the time.
Lavender plants 31 days after germination

DAY 45

Growth is definitely picking up after an extremely slow first month, and you can see in the image (below) that there has been a significant change from five days earlier, but I still get the feeling this plant is going to take its damn time. It sure smells nice, though!

Lavender plants 36 days after germination

DAY 56 (4/4)

The growth rate on these little babies continues to accelerate. Some of the stalks are close to 2 inches tall now (below). They are starting to look like real plants. :)

Lavender nearly 2 months after seeding

DAY 72

Who would have thought lavender would do so well on one of the wettest islands in the world?? Not me. Looking at those puny, fragile seedlings in the beginning, I didn't expect them to survive at all. And then they grew so slowly or not at all for the first month. But there you are (below). At the current growing rate, I'll certainly have flowering plants before the end of the year. The pot is filling out and the plants are definitely thriving. And they're tough. They can take the most brutal sunny days without any wilting as long as I keep them well-watered.

72-day-old lavender grown from seed

DAY 92

The lavender has filled about 80% of the pot now (below). Another month and the whole thing will be full.
3-month-old lavender

DAY 100

Plant stems are starting to get woody, but the plant hasn't spread as much in the last week as it was before.

DAY 165

The lavender is looking like it might not be too long before I get some blossoms. It smells amazing and attracts all sorts of butterflies. Unfortunately, we don't have bees here. :( Just saw a recipe for lavender cookies that I'd like to try eventually. Here's what it looks like now (below).

165-day-old lavender grown from seed

DAY 209 (9/5) - DIE-OFF FROM ACCIDENTAL OVER-WATERING

At first I thought the plants were being baked in our extremely hot temps we've been having all summer, but lavender is a Mediterranean plant and thrives in hot, dry weather. Then I thought something might actually be eating the woody part of the plant. I've observed tiny little creatures in the soil. They look like little wood lice. Now I'm pretty sure that the problems stem from too much water. For a while the plant was near the outer edge of the garden shelter and was getting wind-blown rain. About a third of the plant, near the center, turned gray and withered. When I pulled at the dead parts, they came out and the roots were clearly rotten--an obvious sign of damp soil. I've put the plant in a spot where it will stay 100% dry and I'm going to wait and see what happens. Hopefully, if the soil dries out, the part of the plant that is still in good shape will have a come-back and survive. There was a major time investment in growing lavender here; I'd hate to lose this plant. I may take some cuttings, too, just to be safe.

209-day-old lavender with an unknown problem