Sweet Basil

Sweet Basil has been hugely successful on Pohnpei, producing 3 cups of leaves about every four days.

Cherry Tomatoes

Trying to grow tomatoes on Pohnpei has been a struggle, but I'm making progress.

Common Herbs

Most of the traditional herbs, including parsley and oregano, have grown like weeds.

Lettuce

I've recently branched out into lettuce-growing and found unexpected success.

Lavender

A plant that has truly surprised me is lavender, which is notoriously difficult to propagate from seed.

Cilantro

Though unhappy with Pohnpei's hot weather, I was able to grow cilantro with care and whip up some nice batches of fresh salsa.

Pesto Pizza

One of the benefits of having so much basil is trying new recipes, like this delicious pesto pizza.

Mint

I was lucky enough to propagate two types of mint from cuttings, though I had no success growing the plant from seed.

Showing posts with label fruit. Show all posts

Tuesday, April 2, 2013

California Wonder 300 TMR Bell Peppers

An Intro to Bell Peppers

MY STATUS: Unsuccessful   

I didn't really put any thought at all into my selection of peppers to grow first. Bell peppers (which Aussie's call capsicum and Pohnpeians call sele) seemed like an obvious choice. I happen to love hot peppers and spicy food in general, having grown up with Northern Mexican cuisine and also lived in South Korea for two years, where hot pepper is used in pretty much everything one consumes. But the kiddies can't handle spicy (yet), so we have to stick to sweet peppers most of the time. I found some California Wonder 300 (TMR) seeds at Home Depot, during a trip to California this winter, and brought them back. The TMR indicates that this cultivar is resistant to Tobacco Mosaic Virus, a pathogen that attacks peppers.

Bell peppers originate in Central and South America and like warm conditions, but not excessively hot temperatures. The ideal temperature range is 70-84 degrees F, which means temp shouldn't be an issue on Pohnpei. Peppers enjoy moist soil, but won't survive waterlogging. All in all, I don't anticipate they will be  particularly difficult to grow here. This is one non-native crop that a lot of locals cultivate successfully. They are even sold in the local markets sometimes, but generally only the green ones. Incidentally, it should be pointed out that red, yellow, orange, and green peppers all come from the same plant; the color merely depends on what point they are picked in the ripening process. Bell peppers will eventually turn red if left on the plant long enough. However, the longer the pepper is unharvested, the more opportunities there are for it to be afflicted by some disease or attacked by a pest. I suppose this is the reason that red bell peppers are more expensive than green bell peppers in the store.

Speaking of stores, bell peppers are shipped in fairly regularly to Pohnpei's grocery stores, but they tend to be very pricy and sometimes arrive in pretty sorry condition. Sometimes they have slimy skins and black spots or even mold blooming around the stems. There is, then, good reason to grow them yourself.

SHALLOW ROOTS

Pepper plants don't have very extensive root systems, so you don't need super deep pots to grow them. In fact, they don't require much room at all. I've seen bell pepper plants growing wonderfully in really small containers. Of course, the less soil there is to work with, the more fertilizing one will need to do over the life of the plant.

PAIR-BONDING

A strategy I've frequently read about involves planting pepper seedlings in pairs, quite close together (an inch or so). Plants seem to benefit from partnership. They shade each other's fruit with their leaves and lean on each other, requiring less artificial support. The yield for each individual is often twice what it would be if the plants were planted in their own pots.

HARVESTING

Peppers should be ready for harvest about 75 days after seedling transplantation.

What I Did

DAY 1 - SOWING

I used a paper start pot for my peppers, filled it with potting soil, and planted a few seeds. I watered fairly heavily right after planting.

DAY 6 - GERMINATION

I see little sprouts (right)!

DAY 23 - PLANTING

I probably could have planted my seedlings (left) earlier, but I didn't have the pots or the soil and was busy with other things.

SOIL PREPARATION:
I chose some wide shallow pots, since each pot would contain a pair of seedlings. As I always do, I put 2 inches of coarse basalt gravel in the bottom, followed by a layer of black sand. I added a very thin layer of steer manure. I hope this won't be too much; if plants get too much nitrogen early on, they get big and lush, but don't set fruit. In my case, the fertilizer is way down in the bottom, and I think the plants will be quite large and near mature before their roots get that deep. The soil mixture was pretty normal--a balanced mixture of store-bought garden soil and Miracle Grow Potting Mix.

DAY 24 - WHITEFLIES SIGHTED

I found two whiteflies on the underside of the leaves of one of the plants (right). This is alarming, because I remember what unchecked whiteflies did to two chili pepper plants we had about a year ago. I bought a bottle of Insecticidal Soap Spray specifically for whiteflies and gave the peppers (and my tomato plants) a good spritz bottom to top. I'm also looking into making some sticky traps and trying a garlic solution.

DAY 26

I'm still finding an occasionally whitefly here and there, but I killed them and washed the leaves of their honeydew. The paired pepper plants are about 3 inches tall now with large healthy leaves.

DAY 51

51-day-old paired pepper plants
There isn't much to report. My plants are healthy, but growing slowly. They are fairly sensitive to hot sun, so I have kept them in partial shade except early in the morning. Whiteflies continue to appear here and there, but the plants are not infested and seem unaffected by the few pests that are there. I think I'll fertilize on the next watering. I probably could have planted in pots with a smaller circumference.

DAY 82 - STRUGGLING

I'm sad to say that my pepper plants haven't progressed much in the last month. I've been afraid to give them too much direct sun, thinking they would fry, but so little is happening that I'm willing to experiment. Today I moved one of the two pairs of plants up onto the roof with the herbs. Another thing I don't think I've been doing enough is fertilizing. I gave both pairs a dose of liquid plant food today and will alternate this with chicken manure next week.

Additionally, I sowed some new seeds in starter pots. If things continue not to go well, I can start over.
Hard, curling leaves on 90-day-old pepper plant

DAY 98 - TERMINATION

Even with more sunlight, these little guys didn't improve. The leaves continued to get stiff and curled in, indicating that something was wrong, and the plants stayed small and didn't flower. I never figured out what was wrong exactly. They didn't resemble any of the photos of diseased pepper plants I looked at. It's possible this is the result of a virus transmitted by the whiteflies.

I decided to pull the plants up and start over with new seedlings. One thing I learned for sure on this first run: I my pots were way too large. On the second run I'll stick to small pots.

FAILED SECOND ATTEMPT

I germinated some new seeds early in the summer and attempted to get them to transplantation size, but no such luck. Peppers--or at least this variety--aren't working for me. They seem to be even more of whitefly-magnet than tomatoes. After about 2 months, I gave up. The seedlings just weren't getting bigger or developing new leaves.

Aunt Ruby's German Green Tomatoes

An Intro to Aunt Ruby's German Green Tomatoes

MY STATUS: Grown Successfully to Harvest 

The German Green cultivar is a recent addition to the heirloom tomatoes, developed by Ruby Arnold of Greeneville, Tennessee, in the 1990s. It is distinctive for its pale green coloration when ripe, sometimes with darker green striations on the shoulders. It's another indeterminate type of tomato, so it will keep bearing as long as the weather is sufficiently warm--well-suited for an unvarying tropical climate. German Green tomatoes are the largest green "beefsteak" (they can get as big as 1 pound). There are said to have a slightly "spicy" or "fruity" flavor. Plants can grow as tall as 4 feet (although on Pohnpei, it would make sense to keep the plants smaller so that they can focus their energy on fruit production) and take 80-90 days to mature. I used Ferry-Morse seeds purchased at Home Depot in Southern California in early winter and sowed them in starter pots about one month later.

Aunt Ruby's German Green Tomato seeds Pretty much everything about this tomato is the same as the others I've talked about on this blog. It needs lots of sun and heat to set fruit, should be protected from rain and planted in a well-draining soil mix, and is vulnerable to the same pests as any other tomato. See Black Krim description for more detailed information. I also did everything with these plants the same as I did with the Black Krim variety, so the notes below are identical.

CROSS-POLLINATION ALERT

If you're growing multiple types of tomatoes at the same time and in close proximity, they can cross-pollinate. This won't affect the current generation of plants in any way, but if you plan to gather seeds from your plants for a second generation, you could end up with some strange unintended hybrids.

What I Did

DAY 1 - SOWING

German Green seedlings
I planted my seeds in small biodegradable starter pots filled with store-bought garden soil--a 1/2 inch hole in the middle and a few seeds in the bottom. I covered the seeds and gave the pot 1/2 medicine cup of water a couple of times during the day, keeping the soil moist but not soggy.


DAY 5 - GERMINATION

Several seedlings shot up on the fifth morning after planting (right).

DAY 8 - THINNING

3-day-old German Green seedlings
The seedlings have reached a height of about 2 inches (left) with thick, hairy stems. I pulled out all but the two tallest, most robust seedlings in each pot.

DAY 13 - APPLICATION OF FISH EMULSION

I've begun watering with a solution of Alaska Fish Emulsion. The seedlings are looking happy.


German Green seedlings 25 days after seeding
DAY 25 - TRANSPLANTATION

I unintentionally let my seedlings go a lot longer than I should have without planting (left). I got occupied with other things and they stayed in their starter pots until I noticed that they seemed to be showing the effects of crowding. I hurried to prepare my pots for planting.

SOIL PREPARATION
:
  • I used a 5.5 gallon pot for each tomato plant to give the roots plenty of room to expand.
  • First, I poured in a 2-inch layer of medium basalt gravel (rinsed). This layer and the following one are there to help the soil stay drained, so the roots of the plants don't rot.
  • Second, I poured in a 1-inch layer of fine black sand. Sand can be purchased at the APSCO Gravel Quarry on Sokehs Island. A 20-kg bag of fine blasting sand costs $5.00. Wash before using.
  • Next, I added a 1-inch layer of steer manure. Once the roots get down toward the bottom of the pot, they'll find a reservoir of extra nutrients.
2-inch layer of medium basalt gravel 1-inch layer of fine basalt sand 1-inch layer of steer manure
  • Finally, the pots were filled nearly to the brim with a balanced mixture of store-bought garden soil and Miracle Grow Potting Mix. Nothing really fancy. I'll add liquid fertilizer as my plants develop.
  • In each pot, I dug a trough about 1/2 inch deep and several inches long and buried my plant stem horizontally in the trough so that only the very top of the plant (including the cotyledons and true leaves) were above ground (below). I did this to counteract the legginess of the plants and encourage greater root development. All those little hairs on the stem will turn into roots and the plant will end up well-anchored and nice and stocky, requiring less artificial support. I pressed the soil down a bit and watered quite deeply.
Planting a tomato seedling stem horizontally

DAY 31 - INSECTICIDAL SOAP SPRAY APPLICATION

I discovered a few whiteflies on the underside of my pepper plant leaves this morning. When I checked the tomato plants, I found one or two on the cherry tomatoes--which are the most developed of the six plants I have. I killed them and then went and bought some insecticidal soap spray at Pohnpei Ace Hardware. I gave all the tomato and pepper plants a spray. I'm also looking into creating some whitefly traps. Apparently, the adult flies are attracted to yellow, so if you cover something yellow with a sticky substance, they will land on it and get stuck. People have also told me that garlic repels whiteflies. I need to test that theory.
German Green plants a couple of days after transplantation

DAY 32

A couple of the leaves have faint dark patches on them. I looked this up, worried that it might be some disease, but it looks like it is probably an effect of the soap spray applied yesterday. It is soap after all; even if it is intended for plants, it must cause some minor cellular damage. I'll keep a close eye on it. Hopefully, they will be okay. Haven't seen any whiteflies since the treatment (right).

DAY 33

German Green plant 28 days after germination
We've had a run of spotty weather lately with a few hot, sunny days scattered amongst many dark, overcast days. The problem with this is that the plants adapt to the sunless weather, becoming more sensitive to light. Then when it gets sunny again, they are shocked by the sudden change and wilt in the fierce rays. I've found that the way to deal with this is to mist the plants with ice water. I only do it when it's super hot and the water is going to quickly evaporate and only with recently transplanted seedlings. It provides the plants the same benefits we get from sweating; the evaporation process cools the plants down. There are risks, however, and I've been watching carefully for any sign of fungi. So far, so good.

Both German Green plants are about 3.75 inches tall now--slightly taller and with greater leaf development than the Black Krim started at the same time.

DAY 49

Like the Krims, the German Greens are doing well (below). From the very beginning they have developed faster than the Krims and are currently a couple of inches taller (13-14 inches). Leaves are healthy and the stems are nice and thick. There have been scattered whitefly finds over the last two weeks, but nothing worrying. I kill the beasts on sight and I now have sticky traps hanging around as well. What these plants really need is more sun and I can't give them that until I get my PVC sun-house structure finished. I'm also super tired of moving 20+ pots around. Maybe this week I'll get it done.

Aunt Ruby's German Green tomato plants 49 days after seeding

DAY 58

Like the Black Krims, my German Greens have surprised me this week with the development of flowers at least two weeks earlier than I expected. These plants have grown faster and are slightly taller than the Krims (about 15 inches), but I expected them to be much bigger than this before the started moving toward fruit production. Hey--as long as fruit develop successfully, I'm happy. So far there are no fully open blossoms, but the receptacles and sepals are there clustered at the top.

Developing flower receptacles on 58-day-old German Green tomato plants

DAY 70 - FLOWERING

One of the two plants has open flowers, while the other is nearly there. It has huge clusters of flower buds, but they haven't opened yet. Both Greens have grown very tall in the last 10-15 days. They are both about 3.5 feet.
70-day-old German Green tomato plants Blossoming German Green tomato plants

DAY 110 - DECLINING HEALTH & TERMINATION

Tomato showing symptoms of Blossom-End Rot
These plants have looked promising throughout most of their development, but unfortunately the whiteflies have really taken their toll. The small number of flies present early on had little effect on the growth of the plants, but by the time all six tomato plants were full-grown, the whitefly population was out of control. Catastrophic leaf loss resulted. I kept the plants trimmed of dead leaves, but new leaves did not seem to develop to replace them. Furthermore, after a period of flowering in which all but one of the flowers either did not pollinate or dropped off when I attempted to vibrate them, all flowering ceased. Between the two plants one tomato began to develop but had a dark rotten spot at the bottom from the very beginning--a symptom of Blossom-End Rot. As the unhealthy plants were just drawing more whiteflies, I decided today to pull them up and dispose of them (along with all the other equally unhealthy tomato plants). It was a tough decision after all my work, but I don't think they were going to produce anything significant. I've already sowed some new seeds in starter pots to begin the process again (sigh).

SECOND ATTEMPT

DAY 1 - NEW SEEDLING TRANSPLANTATION

Today I planted a new German Green plant that I started from seed about a month ago. The seedling was planted in a huge pig feed bag with a layer of gravel at the bottom and filled with potting soil. This bag will provide the plant about three times the growing space of the pots I used during my first tomato run. Hopefully, that will help. Additionally, whiteflies seem not to be present, and the plants are getting maximum sunshine in the garden shelter on the roof. Two Cherokee Purple plants from
German Green plant 21 days after transplantation into a pig feed bag
this same batch, however, came down with Tomato Yellow Leaf Curl Virus, so I'm hoping these are not also infected. The other plants did not show signs until about two weeks after transplantation.

DAY 21 (9/5) - GOOD PROGRESS / DISEASE-FREE

The German Green plant is doing as well, if not better, than the Black Krim plant next to it--both planted at the same time. No sign of disease and no whiteflies. It has grown from a small seedling to about 2 feet tall in a little over two weeks. Leaf growth is good and flower buds are already starting to develop near the top. The trunk is getting nice and thick. As I did with the Super Sweet 100VF and San Marzanos, I'll probably allow two trunks to develop.

DAY 96 (11/20) - FIRST HARVEST

Well, these plants have taken a long, long time to reach maturity. Or rather, the fruit has taken a long time. But I've finally got my first harvest! Three quite massive fruit have been picked and, man, were they delicious! The claims are true. German Green tomatoes have a special flavor--deep, rich, smokey. Delicious! What's interesting, though, is that my fruit didn't stay green as expected. Instead, they ended up a rich golden color. Will the plants continue to produce? I'm not so sure. It's getting late in the year and the sunny weather seems to have mostly subsided. There are still flowers on the plants, so we'll have to wait and see. I'm just stoked that I got a beefsteak tomato to produce at all on this island!

Black Krim Tomatoes

An Intro to Black Krim Tomatoes
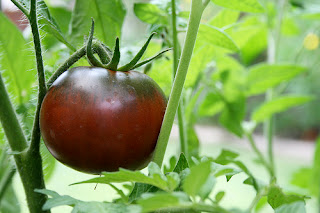
Black Krim tomato on the vineMY STATUS: Unsuccessful   

The Black Krim cultivar originates on the Crimean Peninsula of the Ukraine. It's an indeterminate type of tomato, meaning that it will continue to produce fruit as long as the weather is sufficiently warm--a good choice for Pohnpei's endless summer temperatures. Black Krim tomatoes tend to be medium-sized to large (gardeners call tomatoes of this size "beefsteak"). They are dark maroon with green or brown patterns on the shoulders and a deep purple flesh. Black Krim are known for their rich flavor and are a perfect tomato for salads and sandwiches. Plants can grow to a height of 40 inches and take 80-100 days to mature. I used Ferry-Morse seeds purchased at Home Depot in Southern California in early winter and sowed them in starter pots about one month later.

SUN, SUN, SUN

Black Krim seedsLike any other tomato, Black Krim tomatoes need tons of sun and plenty of heat to achieve maximum productivity. Too little UV and the plants will just carry on without flowering. With an average of only two cloudless days a year on Pohnpei, my guess is that the bumper crops you would get in a place like California are probably out of reach. But, we'll see. So far I haven't met anyone here who has tried to grow this variety, but I chose it because it is supposedly more tolerant to extreme humidity than other tomatoes. Plus it's super yummy and visually delicious as well!

RAIN PROTECTION

Tomatoes don't like to be wet. They need to be watered deeply two or three times a week, depending on how much sun they're getting, but will drown, rot, or develop fungal infections if exposed to Pohnpei's rains. Blossom-end rot is the result of the opposite extreme--too little water. Use the four-inch soil test to determine when to water.

BUGS

Black Krim tomato After bacterial and fungal infections, pests are the next biggest threat. Many varieties of worms, beetles, mites, aphids, and whiteflies consider tomato plants scrumptious. As soon as I get a complete verified list of the pests found on Pohnpei, I'll post it on this blog. Hornworms, which are notorious for ravaging tomatoes elsewhere, may not be present here. I'm looking into it. Whiteflies are rampant and can easily get out of control. I've already encountered a few and have taken steps to prevent them from multiplying.

CROSS-POLLINATION ALERT

If you're growing multiple types of tomatoes at the same time and in close proximity, they can cross-pollinate. This won't affect the current generation of plants in any way, but if you plan to gather seeds from your plants for a second generation, you could end up with some strange unintended hybrids.

What I Did

DAY 1 - SOWING

I planted my seeds in small biodegradable starter pots filled with store-bought garden soil--a 1/2 inch hole in the middle and a few seeds in the bottom. I covered the seeds and gave the pot 1/2 medicine cup of water a couple of times during the day, keeping the soil moist but not soggy.


Black Krim seedlings
DAY 5 - GERMINATION

Several Black Krim seedlings shot up on the fifth morning after planting (left).

DAY 8 - THINNING

Black Krim seedlings a week after germination
The seedlings have reached a height of about 2 inches (right) with thick, hairy stems. I pulled out all but the two tallest, most robust seedlings in each pot. This is a prime example of artificial selection. By keeping only the fastest-growing, healthiest seedlings, you're increasing your chances of success.

DAY 13 - APPLICATION OF FISH EMULSION

I've begun watering with a solution of Alaska Fish Emulsion. The seedlings are looking happy.

Black Krim tomato seedlings 20 days after germination
DAY 25 - TRANSPLANTATION

I unintentionally let my seedlings go a lot longer than I should have without planting (left). I got occupied with other things and they stayed in their starter pots until I noticed that they seemed to be showing the effects of crowding. I hurried to prepare my pots for planting.

SOIL PREPARATION
:
  • I used a 5.5 gallon pot for each tomato plant to give the roots plenty of room to expand.
  • First, I poured in a 2-inch layer of medium basalt gravel (rinsed). This layer and the following one are there to help the soil stay drained, so the roots of the plants don't rot.
  • Second, I poured in a 1-inch layer of fine black sand. Sand can be purchased at the APSCO Gravel Quarry on Sokehs Island. A 20-kg bag of fine blasting sand costs $5.00. Wash before using.
  • Next, I added a 1-inch layer of steer manure. Once the roots get down toward the bottom of the pot, they'll find a reservoir of extra nutrients.
2-inch layer of medium basalt gravel 1-inch layer of fine basalt sand 1-inch layer of steer manure
  • Finally, the pots were filled nearly to the brim with a balanced mixture of store-bought garden soil and Miracle Grow Potting Mix. Nothing really fancy. I'll add liquid fertilizer as my plants develop.
  • In each pot, I dug a trough about 1/2 inch deep and several inches long and buried my plant stem horizontally in the trough so that only the very top of the plant (including the cotyledons and true leaves) were above ground (below). I did this to counteract the legginess of the plants and encourage greater root development. All those little hairs on the stem will turn into roots and the plant will end up well-anchored and nice and stocky, requiring less artificial support. I pressed the soil down a bit and watered quite deeply.
Planting a tomato seedling stem horizontally

DAY 31 - INSECTICIDAL SOAP SPRAY APPLICATION

I discovered a few whiteflies on the underside of my pepper plant leaves this morning. When I checked the tomato plants, I found one or two on the cherry tomatoes--which are the most developed of the six plants I have. I killed them and then went and bought some insecticidal soap spray at Pohnpei Ace Hardware. I gave all the plants a spray. I'm also looking into creating some whitefly traps. Apparently, the adult flies are attracted to yellow, so if you cover something yellow with a sticky substance, they will land on it and get stuck. People have also told me that garlic repels whiteflies. I need to test that theory.
Black Krim plants a couple of days after transplantation

DAY 32

A couple of the leaves have faint dark patches on them. I looked this up, worried that it might be some disease, but it looks like it is probably an effect of the soap spray applied yesterday. It is soap after all; even if it is intended for plants, it must cause some minor cellular damage. I'll keep a close eye on it. Hopefully, they will be okay. Haven't seen any whiteflies since the treatment (right).

DAY 33

We've had a run of spotty weather lately with a few hot, sunny days scattered amongst many dark, overcast days. The problem with this is that the plants adapt to the sunless weather, becoming more sensitive to light. Then when it gets sunny again, they are shocked by the sudden change and wilt in the fierce rays. I've found that the way to deal with this is to mist the plants with ice water. I only do it when it's super hot and the water is going to quickly evaporate. It provides the plants the same benefits we get from sweating; the evaporation process cools the plants down. There are risks, however, and I've been watching carefully for any sign of fungi. So far, so good.

Both Black Krim plants are about 3.5 inches tall now. Though they germinated before my German Green's, they have grown slower and are slightly smaller with less advanced leaf development. One of the plants is shorter and scrawnier than the other, but they seem to be fine and growing well now that they're in a deep pot.

Black Krim tomato plants 49 days after seeding

DAY 49

The Krims are chugging along. They haven't grown at quite the break-neck speed of the cherry tomatoes, but then they are larger plants overall. Both plants are about 12 inches tall with thick, sturdy stems. I've found and killed some whiteflies here and there over the last couple of weeks, but the plants are not infested and seem very robust and healthy.

I wasn't really watering any of the tomatoes properly in the beginning, but I've got that process down now. Shallow watering = bad. Deep watering = good. Do the 4-inch soil test to gauge when to water rather than watering on a schedule. Dig a little four inch deep hole. If the soil is damp at that depth, do not water. If it's dry, give the plant enough water that there is one standing inch above the soil. Excess water will drain through if you've prepared your pot and soil right. The point is that the soil needs to get wet all the way to the bottom. If you water shallow as I was doing, the plant's roots don't grow down because there is plenty of water near the top. On the other hand, if you water deeply, the very bottom of the pot is the last place to retain moisture. As the soil dries out, the plant is forced to dig deeper to find the water it needs.

DAY 58

The plants are about 14-15 inches tall now and look good with very thick stems. They seem to be doing great . . . but they shouldn't be anywhere near mature yet at only 58 days; Black Krim usually take 80-85 days to reach fruiting age. They're much shorter than the cherry tomatoes were when they started flowering. And yet, here they are developing HUGE flowers already! If they end up fruiting earlier than expected, I'm certainly not going to complain, but it is strange. The flowers are very different from the ones on the cherry tomato plants; not only are they massive, but they're shaped differently and have many more petals. They almost look like miniature sunflowers.

Flowering 58-day-old Black Krim tomato plant Blossom on 58-day-old Black Krim tomato plant

DAY 70 - FLOWERING

I'm not sure what the initial giant blossom was all about, but one of the two Krims now has more normal size flowers on it and a whole cluster of receptacles that haven't yet bloomed. One of the plants is about 4 feet tall, while the other is at least a foot shorter. I'm not sure why. I've been vibrating the flowers a couple of times daily to ensure pollination.

70-day-old Black Krim tomato plant

DAY 110 - DECLINING HEALTH & TERMINATION

The Krims, along with two cherry tomatoes, and two German Green plants all succumbed to the effects of whitefly infestation. Catastrophic leaf loss and increased stress caused by whiteflies constantly sucking the sap of the plant rendered the brief period of flowering useless. Most flowers either did not pollinate or dropped off when I attempted to vibrate them. After the first bloom, there were no others. I pulled up and disposed of all six tomato plants to save my other plants; unhealthy plants just draw more and more pests. When the plants were pulled up, it was obvious that they were pot-bound and that larger containers would be needed for future attempts.

SECOND ATTEMPT

DAY 1 - NEW SEEDLING TRANSPLANTATION

Today I planted a new Black Krim plant that I started from seed about a month ago. The seedling was planted in a huge pig feed bag with a layer of gravel at the bottom and filled with potting soil. This bag will provide the plant about three times the growing space of the pots I used during my first tomato run. Hopefully, that will help. Additionally, whiteflies are not present, and the plants are getting maximum sunshine in the garden shelter on the roof. Two Cherokee Purple plants from this
Black Krim plant 21 days after transplantation in pig feed bag
same batch, however, came down with Tomato Yellow Leaf Curl Virus, so I'm hoping these are not also infected. The other plants did not show signs until about two weeks after transplantation.

DAY 21 (9/5) - GOOD PROGRESS / DISEASE-FREE

My plant has passed the point of development at which symptoms of Tomato Yellow Leaf Curl Virus became apparent in previous plants.  I'm hoping I can officially declare this plant disease-free. Growth is good and the plant is already starting to develop flower buds even though it's still less than 2 feet tall. It is not growing quite as fast as the German Green plant started and transplanted at the same time, but that was the case before as well. If this sunny weather continues, the plant will quickly catch up to the San Marzano and Super Sweet 100VF plants.